Compass Marine Bed It Butyl Tape
High quality marine grade butyl tape!!
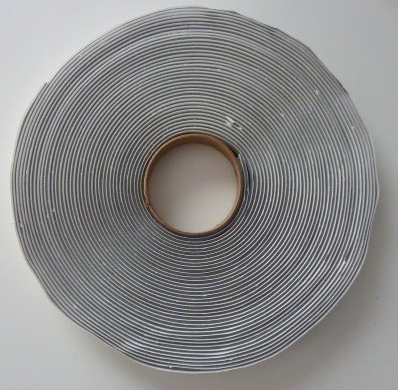
Bed-It Tape is gray in color, 1/16" thick and 1/2" wide and comes in a 50' roll. Designed to survive the long term in the marine environment, it is the perfect consistency & width for bedding deck hardware. rolls are sold individually.
Additional Info
Bed-It Tape is specifically formulated and extruded for the installation of deck fittings to the decks of boats. All aspects of the installation procedure and necessary formulation requirements have been brought together in a marine specific bedding tape.
It has been designed to:
*Work across wide temperature ranges with minimal "creep" or cold flow even in hot climates
*Formulated to have exceptional tolerance to withstand slight movement between deck and fitting
*Stand up to typical boat washing chemicals
*Stick to the parts not your fingers
*Have the proper density for use in a "compression" application.
*Have right density to allow it to displace from under the fitting in a reasonable time frame
- Bed-It Tape is made only from the finest materials and has been designed to exceed the quality of pre EPA tapes that have lasted for 30+ years..
- Bed-It Tape is not an RV, Masonsry, HVAC or glazing product it was specifically formulated for use in bedding deck hardware.
- Bed-It Tape is made in the USA
HOW TO :
Step 1 - Countersink the deck holes slightly and then clean everything with Acetone or a similar fast evaporating solvent.
So why on earth do I countersink or chamfer the deck side of the skins?
#1 It does a lot to prevent gelcoat crazing. By feathering the edge of the gelcoat, through the use of countersink bit, you are now a lot less likely to start a crack or craze mark in the gelcoat. Gelocat is an un-reinforced product and because of this its prone to cracking. Sharp right angle holes are a good place for these cracks to begin when you tighten the deck hardware and potentially flex the substrate. Beveling the edge of the hole or feathering it limits the ability of the crack to begin or start. This is why you often see holes drilled into plate glass that will have beveled or rounded edges too.
#2 By creating a bevel or countersunk recess in the surface of the deck the marine sealant or butyl tape has a cavity to fill. Without a bevel the hardware would compress the sealant to about 1/64th of an inch thick after the fasteners are tightened. Marine sealants do have some flexibility but not as much as you would guess. Follow me for a moment; Let's say you have a marine sealant that has a rating of 400% elongation before break on a 1/64" thick joint. Simple math shows you that 400% of 1/64" is only 1/16" of total allowable joint movement before a joint failure or leak starts. In the case of a stanchion base 1/16" is not much allowable movement before failure.
#3 By countersinking around the bolt holes you increase the maximum thickness of the sealant, at the bevel, to roughly a 3/32" depth at it's deepest point. Using the same math as above 3/32" X 400% gives you a total joint movement before failure of 3/8". If a mechanically fastened joint is moving 3/8" you have more problems than just a deck leak! So 1/16" allowable movement before failure at 400% without countersinking or 3/8" allowable movement at 400% before failure with countersinking. Even a small bevel will drastically increase max allowable movement before failure. Countersinking to a mere 1/16" depth will give you 1/4" total movement around the bolt before failure. You don't need a deep bevel to make a large difference between a failure and a seal.
#4 Countersinking is a no brainer and has many many benefits. For instance, you can install the fitting and tighten it down NOW with no waiting and you can seal deck hardware alone.
Step 2 - Wrap Bolt Heads - You'll want to rip off a small piece of butyl and knead it into a string then wrap the underside of the bolt or machine screw head.
Step 3 - Press the through bolts into deck hardware with some good pressure.
First though make sure the hardware is clean, Acetone works well, but if Silicone was previously used you'll really want abrasives as Acetone won't touch dry silicone contamination.
Gelcoat silicone contamination is a whole other subject for a whole other day. Please avoid silicone except for certain tasks involving plastics that require its use.
Flip Deck Hardware
Once the bolt heads are wrapped and pushed through flip the hardware over.
Step 4 - Strip some more butyl tape and make another round string. Wrap the string around the bolt threads or shoulder. Knead and work & twist the cones into the threads of the bolt and shape them like a cone.
Step 5 - Apply butyl tape to the rest of the base. It is perfectly ok to stretch and pull on the butyl while laying it on in order to make slightly thinner.
Step 6- In colder climates you may want to pre-heat the butyl to soften it some. After pre-heating, with heat gun on the warm setting, line up the bolts with the holes and press the hardware firmly onto the deck. I will often stand on the fitting, if possible, to partially displace and seat the butyl.
Step 7 - Install the backing plates or washers and begin to tighten. Please use suitable backing plates.
You will be best to have two people or a good way to keep the bolt from moving. Ideally you do not want the machine screw or bolt to spin, but if you absolutely have to, you can slightly soften the butyl with a q-tip and some mineral spirits and go for it.
*****IMPORTANT, IMPORTANT, IMPORTANT*****
Tighten a little bit at a time as the butyl will ooze out slowly because the consistency is quite thick by design. Tighten, let sit, tighten, let sit etc. etc.. When little to none squishes out & the bolt & nut become tight you can stop. This can take DAYS of small tightening events or weeks if you want to spread it out. It does not cure so do not rush it..
If you have a wood deck core DO NOT crush it by over tightening, better yet bore out some core and pot the hole with thickened epoxy. Unlike the "two step" method you are not waiting for the butyl to "cure" or change consistency but you do need to allow it to slowly displace out from under the fitting. This compression & squeezing forces the butyl into every nook and cranny and makes for an excellent seal..
After tightening, the excess butyl will squeeze out around the edges. The easiest way to clean it up is to pull or peel it away first. Use some of the excess butyl to make a small ball that you can then make quick stab & pull motions at the remaining oooze around the fitting. This quick stab & pull with a butyl ball in hand motion will get about 85-90% of the butyl cleaned up.
Step 8 - Peel away excess ooze and clean with Meguiars cleaner wax, or a rag slightly dampened with mineral spirits. Do not saturate the rag with mineral spirits as it can creep under the fitting, just damp.
I find a ball of already "peeled" butyl works well at pulling away excess using a stab and pull motion. Stab the ball into the joint and pull away. The butyl will stick to the ball first and usually peel away from the joint. Alternatively you can use plastic razor blades or scrapers.
Contrary to popular myths about bedding all the Bed-It Tape does not squeeze out from between the surfaces even after the fitting is fully tight. This is the magic of Bed-It Tape, but it does take multiple small tightening events, ideally without letting the bolt spin, to get the vast majority of the butyl to squeeze out. If you do spin the bolt a little don't fret about it. Butyl does not harden of change consistency, like in the two step process with a marine sealant, and can take some spinning without causing a leak. Still the less spinning the better.
*****IMPORTANT, IMPORTANT, IMPORTANT*****
DO NOT try and tighten the hardware to fully tight right away. Bed-It Tape relies on a slow compression to do it's job and seal properly. It takes time for it to compress, displace and move into every nook and cranny. The larger the deck fitting the MORE TIME it takes for this process to take place. Because of the density and formulation of Bed-It Tape it takes time for it to get displaced and squished out the edges of the fitting. When it stops you can stop making small tightening adjustments.
Bed-It Tape is pretty dense, and the perfect consistency for bedding marine deck hardware, but you must be patient when tightening the hardware. Remember you're not waiting for the butyl to change consistency, harden or cure so these tightening adjustments are not time constrained at all. If you can't get back to it for a month just pick up where you left off.
I sometimes take about two to three days of small tightening events to bed the hardware. Yes this is more labor intensive but the finished product, when done correctly, can still be bone dry beyond 30 years.
In colder weather butyl flows slower than in warm so just adjust the tightening adjustments based on temp and how fast it is displacing..